
Securing the Internet and your Computer
Monsoon's 2.1 PC Speakers Review
Acer 2200/2203LCi Laptop Review
Zalman Theatre 5.1 Headphone Review
Creative Zen Micro MP3 player Review
Samsung's CLP300 Colour Laser printer Review
Canon 8400F Photo Scanner Review
Canon Selphy CP510 Photo Printer Review
Windows Vista x86 and x64 versions should we upgrade?
SilverStone GD01MX HTPC Case Review
Corsair Survivor GT 8GB USB Flash Drive Review
Mio P550 Digiwalker
GPS PDA Review
Recode DVD's to H.264 with AAC 5.1
Guide to Install OS X 'Leopard' on a PC
Guide to install OS X 'Snow Leopard' PC
AVerTV Hybrid Volar MAX Review
Recode DVD's to H.264 with AAC 5.1
With 200GB and larger drives becoming the norm in most computers many users are discovering a new way to make use of the space by keeping various DVD's on the computers hard-drive to view at their leisure. But even a 200GB drive can fill up very quickly as most DVD's are at least 4.3 Gb in size, a typical 200Gb can hold around 40 movies and if you have a 1TB drive you can expect to store 225 movies, which when used with a HTPC allows you to pick and choose which movie you wish to watch with a simple click of the mouse. Sounds rather nice but what if you could use a compression to reduce the size of the DVD to 1/6 of the size and still retain the Dolby Digital 5.1 soundtrack. This would allow you to store over 240 Movies on a 200GB drive and a staggering 1,350 Movies on a 1TB drive!
Enter H.264 and AAC, these rather new technologies can perform this feat but at the time of this article only one program was able to recode with AAC 5.1 support and that is Nero recode 2. Now you may have heard about DivX and it also can perform very-good compression but H.264 has better quality at lower bitrates then what is obtainable currently with DivX. Throw in AAC 5.1 support and your compressed file will be almost indistinguishable from the source. I have found the best package to view the files is called CCCP (Combined Community Codec Pack) I suggest you download and install it before attempting to play any H.264 files (.mp4 and .mkv) you can download it from Here.
Nero Recode can be hard to configure for first time users and the amount of options and settings can be intimidating so I have prepared this guide for those of you who would like to try and recode DVD's to this new format. These settings were developed by me and it took many hours of trial and error with side by side viewing's to determine which setting actually made a difference and to try and determine the best bitrates to use. These settings may be improved upon and are a good head-start so feel free to experiment, just a note that newer versions of Recode may have the options in different locations and the newest version adds support for filters. I have not had a chance to play with these Filters so you will not see any mention of them in these instructions.
Obviously you will need to have the Nero Suite installed before starting this section if you don't have it yet it can be purchased from Nero (the last time I checked it was $63.99) I will also mention the program will not work with Protected DVD's (Store bought) so you will need to rip the DVD to your computers hard-drive first, if you need help on how to complete this step click Here
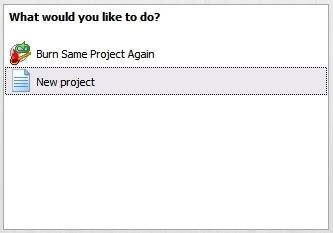 |
Lets start by launching the Nero Recode application, once it has been opened you need to choose what you wish to do with it by clicking the apropriate section in the menu window. I have only captured the specific screens we need to be working with for this tutorial instead of capturing the entire recode window, hopefully this will save space and will prevent confusion if the Menus are changed in later versions of the program. We will be starting a 'New Project' so select that option and click the 'Next' button to continue. |
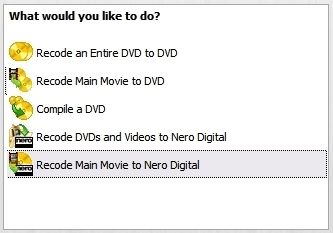 |
The option here that you will need to use is 'Recode Main Movie to Nero Digital' so select it and click the 'Next' button to continue. I will mention that for encoding Videos from other formats to H.264 you can use the 'Recode DVD's and Videos to Nero Digital' option which is also handy if you wish to keep some of the extras found on some DVD's. |
 |
Hit the 'Import DVD' button which will open a browse window so you can find the folder or drive your DVD/Files are located, select the file/folder/device to import and click the 'OK' button when you are done. You may see window asking if you wish to import all titles or just what Nero thinks is the main title I suggest hitting the import all option as you can verify the titles and delete any tracks you don't wish to encode by clicking on them and pressing the delete button on the keyboard. You will see a window open and the Video will be shown as it is analyzed. |
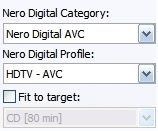 |
You will need to first uncheck the box that says 'Fit to target:' or you will not be able to customize the bitrate. Under the 'Nero Digital Category' we want to use 'Nero Digital AVC' which is the H.264 codec otherwise known as AVC (Advanced Video Coding). Under the 'Nero Digital Profile' you will need to select 'HDTV - AVC' as this is one of the profiles that will allow you to use the AAC 5.1 option, some of the other profiles will not allow you to select it otherwise and the encoder settings later will also have some features disabled. |
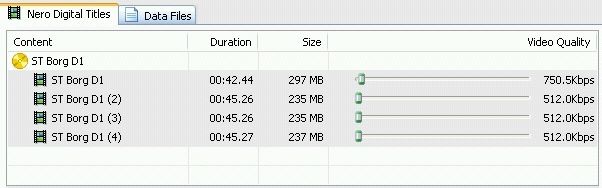
In the 'Nero Digital Titles' window you will see the bit-rate sliders, the best way to set the bitrate is to click on the slider and use the left < > right arrows on your keyboard to fine tune the numbers as setting them with the mouse is much more difficult. I suggest you use 750Kbps as this gives the best balance of quality and size for all movies, even those with lots of action sequences. Feel free to lower the bitrate if you need to keep the movie within a certain size, the size will grow/shrink as you change the bitrate.
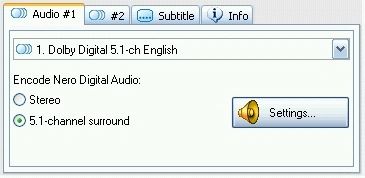 |
This windows allows you to select which language track you wish to use as the main track and obviously you can decide between 'Stereo' or '5.1 channel surround' you can also add a second soundtrack which could be a different language or even a director's commentary by clicking the Tab labeled '#2'. The Tab marked 'Subtitle' is for the inclusion of Subtitles and the English subtitles will be loaded automatically if found on the DVD the option to add a second subtitle also appears if more than one is found on the source. |
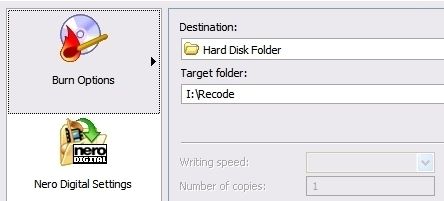 |
After pressing the 'Next. button you will see this page, start by selecting the 'Burn Options' and change the destination to a 'Hard Disk Folder' then select the 'Target Folder' which is where the file will be put when completed. |
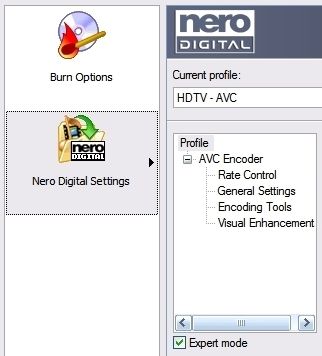 |
Now select the 'Nero Digital Settings' button to see the settings window. The first thing you need to do when you see this screen is to make sure the 'Expert Mode' box is checked or you will not be able to see all the options that need to be set. If you see a completely different set of options on this screen you most likely have the codec set to 'ASP' rather than 'AVC' use the back button to select the right codec and when you return it will present you with the correct set of options.The first option that needs to be changed is the 'Rate Control' by default it is set to 'Fast (1 pass)' this setting must be changed to 'High Quality Encoding (2-Pass)' as the quality with the 1 pass setting is far from what we want to achieve. |
In the 'General Setting' section You should move the slider under 'Decision Quality' to the far right which is marked as 'High Quality' this will make the encoding slower but the difference in output is noticeable. The other options are fine at the default settings and should not require any changes.
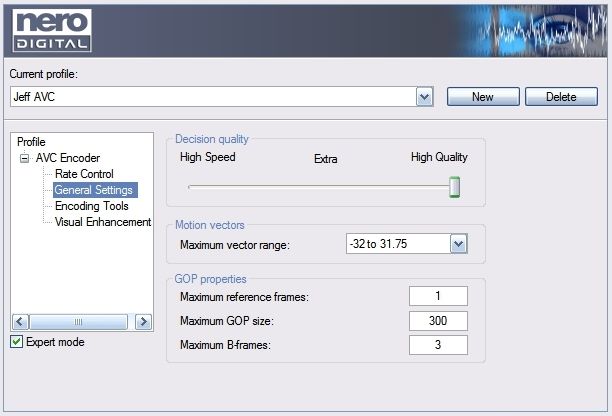
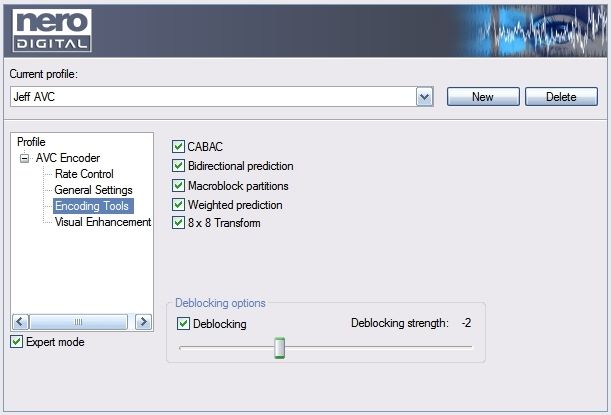
Under the 'Encoding Tools' section make sure the 8x8 Transform is selected as this greatly reduces the 'blockiness' associated with compressed video by creating smaller blocks. You'll also notice the 'Deblocking' Slider, the default setting seems to work best but feel free to try different settings.
The last section is called 'Visual Enhancements' and the default settings shown work fine.

Now hit the 'Burn' button which depending on the version of recode you are using opens your browser and displays a 'Nero Digital information page' but most importantly it starts the recode process and if you set everything correctly will show you a spinning 'Recode' logo while the information screen will show the Title being encoded with (1st Pass) then when encoding the (2nd Pass) the video preview should be shown. I will mention this annoyance with the recode program when it writes the output file it will only output the first 16 characters of the file/folder name so be careful and make sure the file name created is enough for you to identify what it is before proceeding with any other encodes.
I will also mention that you can run more than one instance of Recode at one time and if you have a Core Duo/Quad CPU you can run Multiple instances and each instance will only use one CPU. If you have a Dual core CPU then two instances will run fine and take no longer to encode then running a single instance, this is because the program does not take advantage of the extra CPU and having multiple cores does not reduce the time it takes to encode the files so try to run Multiple instances whenever possible.
Depending on the speed of your CPU and the actual length of the Movie you are encoding expect it to take any where from 2-4 hours on a reasonably powerful 2.0Ghz+ Cpu. Feel free to send me any changes that you have made that enhance the Quality of the file by clicking Here.
The last thing I should mention is that the CCCP (Combined Community Codec Pack) combined with Media player Classic is the best viewing option. I have found that under the 'FFDShow video decoder configuration' that selecting the 'DeBand' filter really helps in preventing the rainbow/stair-stepping effect seen in dark scenes along large items such as walls. The last filter I like to use is the 'Sharpen' filter, the effect is more subtle but it does improve the picture. The last thing you will need is a program called AC3 Filter this little program can encode any audio source to AC3 on-the-fly and send it over SPDIF to the receiver grab it Here.