
Securing the Internet and your Computer
Monsoon's 2.1 PC Speakers Review
Acer 2200/2203LCi Laptop Review
Zalman Theatre 5.1 Headphone Review
Creative Zen Micro MP3 player Review
Samsung's CLP300 Colour Laser printer Review
Canon 8400F Photo Scanner Review
Canon Selphy CP510 Photo Printer Review
Windows Vista x86 and x64 versions should we upgrade?
SilverStone GD01MX HTPC Case Review
Corsair Survivor GT 8GB USB Flash Drive Review
Mio P550 Digiwalker
GPS PDA Review
Recode DVD's to H.264 with AAC 5.1
Guide to Install OS X 'Leopard' on a PC
Guide to install OS X 'Snow Leopard' PC
AVerTV Hybrid Volar MAX Review
How to install the 'Snow Leopard' Mac OSX (10.6) on almost any Intel based PC or Laptop to create a Hackintosh!
Some of this article is a repeat of the Leopard install article, if you've just want to jump to the install instructions then click Here
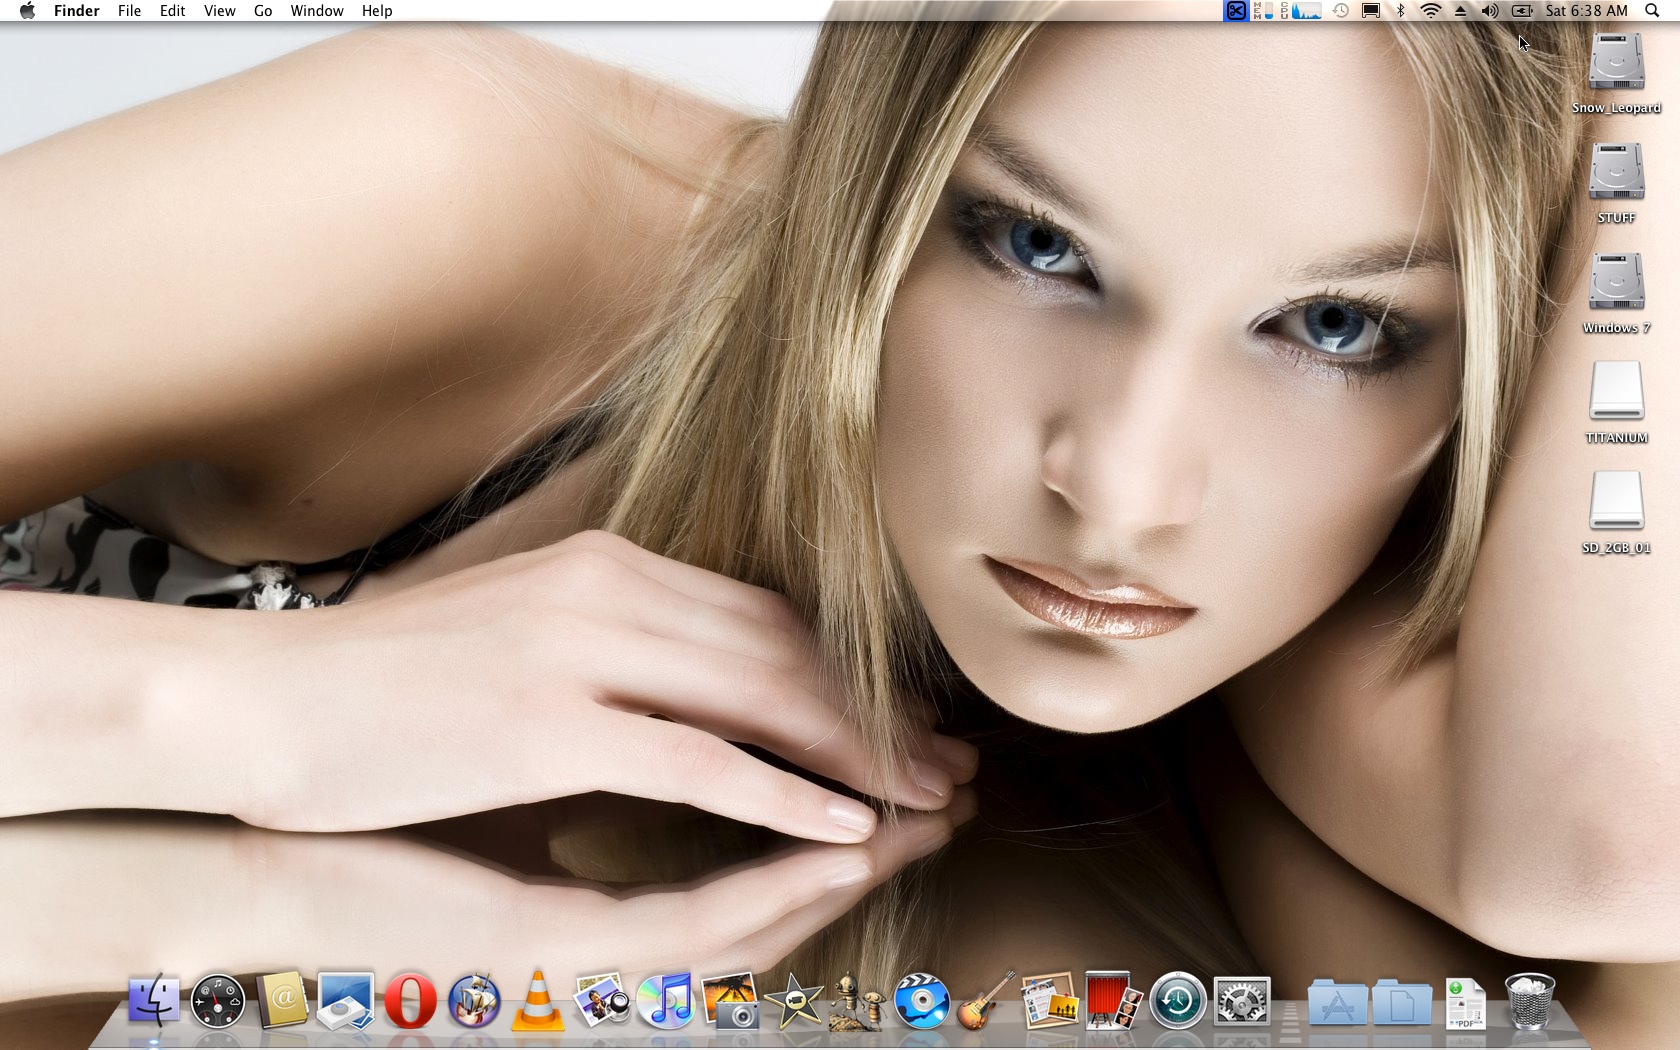
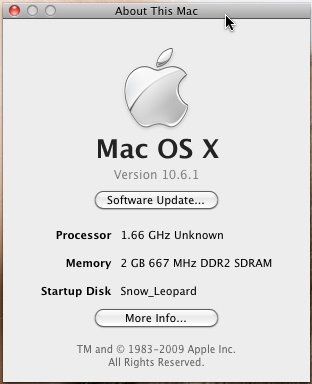
Here is a screen capture from the externally connected monitor running at 1680x1050 on the MSI Wind U100 running Snow leopard 10.6.1 (click to enlarge)
Some of you may be asking why anyone would bother trying to accomplish this when they could just buy a Mac to run OS X, Well a couple of reasons the first reason relates to the fact that not everyone can or wants to purchase a Mac, second reason relates to trying OS without investing in any hardware. The third reason is related to the challenge of getting the Mac OS running on machines not designed or approved to run the OS. I have always wished someone would give Microsoft some competition and the Mac OS, if ever released to run on general PC hardware could challenge Microsoft for the desktop. The two most likely reasons we would never see it happen, PC hardware manufacturers have so many different combinations of CPU's, chipset's and devices in their machines that Apple would have a hard time trying to make the OS work with all the possible hardware out in the wild. The second more plausible reason is that if Apple released the OS to the masses what compelling reason would anyone have to purchase Apple hardware?
If anyone missed it Apple ditched the old Power PC CPU's and migrated to Intel CPU's, in fact much of the Apple hardware listed is available in many generic PC/Laptop configurations so to ensure the OS would remain a Apple only OS they went with EFI (Extensible Firmware Interface) instead of the BIOS (Basic Input/Output System), then they added a module called a TPM (Trusted Platform Module) its function, for now, seems to be to simply to avoid the possibility that Mac OS X could run on non-Apple computers. If you remove TPM issue and create an EFI workaround then the OS will install on any system, obviously these problems have been overcome or this article would not be possible. Heck if you want you can even order a PC with OS X installed from Psystar or if you want try another option have a look at the EFI-X module that will allow you to install OS X without bypassing EFI or the TPM.
Before you attempt this you should understand that it may not be easy unless you happen to have the exact hardware that an existing Mac uses as Apple only writes drivers for hardware they use. To ensure a success you should try and match your hardware as closely as possible to what Apple has used in any of their various systems. Hardware compatibility lists do exist but keeping them up to date is next to impossible as new hardware and revisions are always being released.
The best compatibility seems to be with Intel CPU's Using Intel Chipset's, Not that AMD CPU's won't work they will but they require a hacked kernal designed with them in mind and they are not recommended for OS X because of stability issues. Some Intel CPU's also have issues so I suggest you try and use an Intel 'Core Duo' or Intel 'Core 2 Duo' based machine (Atom processors also work) as others will not be nearly as stable and reliable. You also require a DVD Drive to perform the install and most video cards should work in VESA compatible mode but you may not have accelerated graphics. Other devices may not be recognized so you may not have internet access right-away. Lastly anyone who is planning on having a dual-boot system with Windows and the Mac OS should read the Dual-Boot section below to prepare correctly, click Here to jump to the Dual-Boot section
I suggest you record all the make/model numbers of your hardware as this will make your life easier when trying to select and install kexts (drivers). If possible in Windows XP or Vista open the 'Control Panel' then open the 'System' panel from here select the 'Hardware' tab then select 'Device Manager' now you need to select each piece of hardware then right-click and go to it's 'Properties' from this window select the 'Details' tab and you will see a long string like the one below, record the whole string as you may need this information.
PCI\VEN_8086&DEV_4229&SUBSYS_11008086&REV_61\4&23F5EDAD&0&00E0
The string above is for the Intel Wireless 4965AGN Mini-PCI network card
I have successfully installed Mac OS X on several Desktop PC's and two Sony laptops and a MSI Wind U100 netbook I have also had some failed attempts at getting these systems to install correctly. Remember to be patient as you may have to install or try various things before you have your very own 'Hackintosh'.
Obviously purchasing a copy of Mac OS X is required to legally run the OS, currently the license agreement only allows installing on 'Apple Hardware' but this is being brought before the courts as unfair so until the dust settles you may be breaking the license agreement. The good news is that Apple doesn't seem to be going after individuals who are attempting this so you should be fine.
Those of you who wish to have the ability to Dual-boot with Vista or Windows 7 will be happy to know it can be done quite easily, but I suggest you only attempt this after you have successfully installed Mac OS X and are happy with the configuration. Obviously you need to be willing to sacrifice the data on your Hard drive because you will need to create new partitions and format them to complete the install.
Let's begin...
Rebel EFI and Empire EFI are both tools to allow you to boot and install Snow leopard the difference is that Rebel EFI is a product you must purchase and is currently suspected of using open source code used by the Free open source product Empire EFI, so obviously I suggest you use Empire EFI the most current version was v1.04 the download link is near the bottom of the page just look Darth Vader's face and you should be fine, it can be downloaded from Here. Once you have the file burn the .iso and get ready for some bios tweaking, to enter your PC's 'bios' power on the PC and it should be the [Delete] key but on some systems it can be one of the [F1] to [F12] keys. Once you access the Bios you will need to browse through the menus and check if you have the following options, if you do set them as indicated:
Boot Order = DVD/CD
SATA = ACHI
ACPI = 1.0
Save your changes and exit the bios.
Insert the Mac Empire EFI install disk into your DVD drive and restart the PC it may boot automatically (if you bios is set correctly) or some of you will have to hit the correct [F] key to choose the boot device on my MSI U100 it was [F11]. Assuming everything worked you'll eventually see a boot menu with a few icons (depending on how you current HD was set-up) eject the Empire EFI disk and insert the Snow Leopard DVD, after the light is finished flashing hit the [F5] key to refresh the screen you should see an CD icon with 'Mac OS Install DVD' make sure it is selected and press enter, if all goes well the installer should run and you'll be at the main install screen. If the system locks up then simply hold the power button until the PC turns off and try again, if it locks up again you have something in your hardware config that is causing a problem you can wait for a newer version of Empire EFI to be released that may fix your issue or do some research on your hardware to see if a fix is available. I had an issue on the U100 where the Empire EFI disk would not refresh and show the install disk Ii managed to fix the issue by simply unplugging the USB Optical drive and replugging it and then using the [F5] key
Install screen
Great you managed to reach the install screen, choose your language and click that [OK] button, wait for the next screen to load, we need to partition and format the disk before we can start the actual installation so click the top bar where it says 'Utilities' and from the drop down select 'Disk utility'. Once the Disk utility loads select the Hard-drive' you wish to use. If you plan on changing the existing partitions you can do this here. At the bottom of the window Click on the 'Options' Button and make sure you select the GUID Partition Table. Formatting, make sure you select 'Mac OS Journaled' and give the volume a name (I suggest 'leopard') just don't use any non-standard characters or spaces in the name or you'll have problems accessing your drive if you have to use the command prompt. Apply the changes and when complete simply exit the application, you will be returned to the set-up screen, hit [OK] and agree to the license to continue.
If you partitioned and formatted correctly you should see that drive available to install OS X, select the drive and hit [OK] the install will take about 30 minutes, move the mouse once and a while or the progress bar will not display the current progress correctly until you do. Once the install is complete you will see a window stating the install was not successful (because the boot drive is not set-up correctly don't worry we'll fix it later) and the system may reboot . if you miss the message and the system just reboots don't panic it probably finished the install and you missed the message. The system needs to be booted again using the Empire EFI disk but this time you should be able to boot the newly installed Snow leopard by choosing the 'Apple' icon if you have issues getting the system to boot fully then press the down arrow to get a list of options and choose single user mode (like safe mode in windows) this should get you to the screens where you need to answer some basic questions to create an account and then register the system, you can bypass registration by pressing the [Command]+[Q] keys but since this is a PC the [Command] key should be now be the [Windows] key, the desktop should then load and you'll be able to start using the new install.
Fix the system boot problem
Now open the Empire EFI disk (should be sitting on the desktop if not open finder and locate the disk) and browse to the '/Extra/post-installation' folder and run the myhack installer.mpkg choose the default options and let it install, after about 2 minutes it should complete, close the application and eject the Empire EFI disk by right clicking the disk and choosing eject or dragging the disk icon to the trash icon. once the disk is ejected restart the computer. If everything worked fine you should see your new bootloader and no longer need the Empire EFI disk to start the system.
About DSDT
DSDT is part of ACPI which in turn is part of the BIOS. it tells the operating system what hardware the computer has and how to access it, unlike Apple we have many different companies building hardware so there's a lot of variation. You will likely need to fix your DSDT reflect the correct hardware. The links provided on the Empire EFI disk are direct to the programs if you wish to have more information or help on the DSDT tool click Here, and for the ACPI Patcher click Here. I was lucky and didn't need to touch the DSDT on the MSI U100 but you may have to do some work to get things working, remember the Empire EFI disk will boot your system if all else fails.
kexts (driver description files)
The Empire EFI disk has a link to a database of kexts that can be used on your system but if you want to check it out in advance the site is called www.kexts.com they usually include information on where they should be installed they usually go into '/System/Library/Extensions' and they overwrite existing kexts if they are custom kexts then they are placed into '/Extra/Extensions' after installing any kexts a few commands must be run to enable them correctly failure to do this may result in a unbootable system. The best example of how this needs to be done is from a kext pack I downloaded for netbook (which included the MSI U100 I was using) the basics are as follows.
Copy system kexts to /System/Library/Extensions
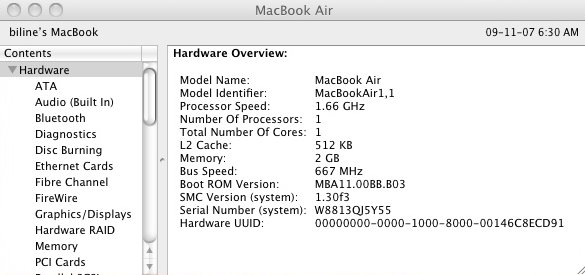
Copy custom kexts to '/Extra/Extensions' If you don’t have Extensions folder in /Extra , create one.Once you’ve done that. Copy smbios.plist and com.apple.boot.plist. These are two important files. SMBIOS injects MacBook Air values to fool the system thinking that its a genuine MacBook Air. The other file is for us to inject EFI Values to our system , this makes devices like the GMA 950 as native as it can get to a MacBook’s GMA 950.
Once done we need to fix permissions and to rebuild kernel cache. start a 'Terminal' by going to apps the Utilities and then selecting the 'Terminal' icon.
To Fix Permissions for /System/Library/Extensions folder type the following commands but remember to replace leopard with the name you gave your partition when creating it.
- sudo chown -R 0:0 /Volumes/leopard/System/Library/Extensions
- sudo find /Volumes/leopard/System/Library/Extensions -type f -exec chmod 644 {} \;
- sudo find /Volumes/leopard/System/Library/Extensions -type d -exec chmod 755 {} \;
- sudo kextcache -v 1 -a i386 -a x86_64 -m /Volumes/leopard/System/Library/Caches/com.apple.kext.caches/Startup/Extensions.mkext /Volumes/leopard/System/Library/Extensions
To Fix Permissions for your /Extra/ folder
- sudo chown -R 0:0 /Volumes/leopard/Extra
- sudo find /Volumes/leopard/Extra -type f -exec chmod 644 {} \;
- sudo find /Volumes/leopard/Extra -type d -exec chmod 755 {} \;
- sudo kextcache -v 1 -a i386 -a x86_64 -m /Volumes/leopard/Extra/Extensions.mkext /Volumes/leopard/Extra/Extensions
A Warning about Updates
Most updates to programs will install without causing any issues, for example updates to Quicktime are fine, but if you install any system updates all of your custom kexts will be replaced and you'll need to re-install them again!
Dual Boot
I have seen many different ways to get this to work but I believe the best option is to use the modified bootcamp assistant which can be found Here. Note Boot Camp is just a “front end” for Disk Utility to make it easier for you to partition your drive so that you can install windows. so if you prefer you can just use Disk Utility to create a new MBR partition and format it with 'Fat 32' with a the name 'bootcamp 'as that's what the assistant will do. The beauty of OS X is that this is all done on the fly without the need to reboot but the process needs to shuffle data around on the HD and this can take an extremely long period of time depending on how much data it has to move around. Once the process is done quit the Assistant/Disk Utility and reboot with Vista or Windows 7 DVD in you Optical Drive. When the install gets to the screen where you must choose the install partition select the one called 'bootcamp' (you may have to reformat the drive using the advanced options). press the enter key and the windows installer should eventually finish but you'll have no way to boot into OS X.
Now we need to download a program called EasyBCD from Here and install it (worst case just grab the file from another working PC and place it on a USB stick).
- Fire-up EasyBCD, and navigate to the "Add/Remove Entries" screen.
- Select "Mac OS X" from the tabs at the top.
- From the platform drop-down list, select "Generic x86 Hardware"
- If you wish to change the name from the default "NST Mac OS X," you may do so now.
- Select "Add Entry" to finish up.
You can now reboot your PC, and select "NST Mac OS X" (or whatever you chose to call it) from the Vista bootloader, you will then be greeted with the familiar boot loader (which will now have an new icon for the Windows partition) simply press enter to boot OS X
Known Hardware issues:
Remember OS X only provides drivers for hardware found in the normal line-up of Mac's so if yours is not the same hardware don't expect much help as third party drivers are scare.
- Many audio chipset's are not fully supported so you may have no sound or sound that works through headphones only or when plugging in headphones the internal speakers won't turn off!
Some work has been done on the Audio chipset's and you may find some drivers that partially work but many are not 100% fully working as the microphone input and headphone output are often problematic
- Wireless cards may not work correctly
The best fix for laptop users with Wireless that won't work is to replace the mini-PCI card with a Broadcom BCM94311 Mini-PCI Wireless card they are often listed as 'DW1390' because that is the part number Dell uses and they can be found for around $20 on e-Bay I changed both of my laptops over to this card and had no issues, but be warned unless your laptop provides an access port for the Mini-PCI slot you may have to remove the entire rear cover to access it. The Sony VGN-CR240D was a pain as I had to remove the entire rear cover to access it but the Sony VGN-CR510D was much easier as I only had to remove two screws in the battery compartment to remove the keyboard which gave me easy access to it's Mini-PCI slot. and Lastly the MSI wind U100 was a real pain I had to remove the entire back cover which was not to bad but the replacement card could not be installed correctly because a stand-off for a screw was blocking the card so i had no choice but to cut the part away obviously not a safe (or smart) option but it worked fine when powered back on.
- Network cards may not work correctly
Some progress has been made with the more common network chips but those that work are usually already included on the install disk
- Memory card readers may not work correctly
Not much progress with internal readers but most external USB readers work fine
The best place to check into your specific hardware is the Insanely Mac forums but you may have quite a lot of reading to wade through to find a solution that works for you and this is where the PCI Device string I suggested you collect earlier becomes very important.
Programs that are a must for your new 'Hackintosh' and all of them are FREE!
- Opera Browser
Integrated mail client, bit-Torrent support, tabbed browsing and many more innovative features to numerous to mention I highly recommend this browser
- Firefox Browser with the awesome Fire FTP plugin
You know the browser so no point mentioning all the features with exception of the great Fire FTP plugin that allows dual panel FTP access with a simple click and point interface.
- Perian or VLC Player
Perian is a free, open source QuickTime component that adds native support for many popular video formats. VLC Player is also a great little player that will open almost any format you can throw at it highly recommended.
- Open Office for Mac
OpenOffice.org (OO.o or OOo) is an office application suite available for a number of different computer operating systems. It supports the OpenDocument standard for data interchange as its default file format, as well as Microsoft Office '97-2003 formats - among many others.
- iStat
iStat pro is a highly configurable widget that lets you monitor every aspect of your Mac, including CPU, memory, disks, network, battery, temperatures, fans, load & uptime and processes. iStat pro can do it all and iStat menus offers the same but on your taskbar!
These are are just a few programs you can grab many more can be found in these places:
Last Words
I have tried to make this guide as easy as possible to follow as many other guides assume the user has a higher level of knowledge then users may actually have, some of you may roll your eyes at the level of detail included but I hope the guide enables any user to perform, or at least attempt an install.
Of course much of this guide is from my experience with installing Mac OS X but I would not have been able to complete my install with out the help from all the dedicated users over at Insanely Mac and the creators of the tools such as 'Empire EFi' and the 'myhack installer' so a big thanks to all of them.