
Securing the Internet and your Computer
Monsoon's 2.1 PC Speakers Review
Acer 2200/2203LCi Laptop Review
Zalman Theatre 5.1 Headphone Review
Creative Zen Micro MP3 player Review
Samsung's CLP300 Colour Laser printer Review
Canon 8400F Photo Scanner Review
Canon Selphy CP510 Photo Printer Review
Windows Vista x86 and x64 versions should we upgrade?
SilverStone GD01MX HTPC Case Review
Corsair Survivor GT 8GB USB Flash Drive Review
Mio P550 Digiwalker
GPS PDA Review
Recode DVD's to H.264 with AAC 5.1
Guide to Install OS X 'Leopard' on a PC
Guide to install OS X 'Snow Leopard' PC
AVerTV Hybrid Volar MAX Review
A fix for GMA950 and GMAX3100 Video Chipsets
First we need to reboot and start the install again but instead of the step where you opened the 'Disk utility' you'll need to open a 'Terminal' where we can enter some commands to fix the problem. Once you are aware that you have this issue when you try any subsequent installs keep a close eye on the install and as soon as you see the 'Install complete rebooting in 30 seconds' screen open the 'Terminal' utility to enter the commands below, while the terminal is open the restart count is stopped until you exit the 'Terminal' program.
Type these exactly as shown but substitute leopard for whatever you labeled your install drive while formatting it and note that all the commands are case sensitive.
cd /Volumes/leopard/System/Library/Extensions
Let's make sure you are in the correct directory, type:
ls *GMA*
You should see a bunch of files with GMA in them such as 'AppleIntelGMA950.kext' if not you are not in the correct directory, you may have to scroll up/down to see them, if not try the first command again and check for the files, once you have verified you are in the correct directory then type:
rm -rf AppleIntel*
You will not really see anything happen so lets check to see if the files were deleted, type:
ls *GMA*
You should not see any files that start with 'AppleIntel', if this is the case then we can proceed, type:
diskutil repairPermissions /Volumes/leopard
You will see the diskutil start and it will tell you when it has finished along with any errors it has fixed. Now we can close the 'Terminal' utility, you may notice that no option to exit the install is present so just hold your power key for about 4-5 seconds and the PC/Laptop will power down, now restart the system without the install DVD in the drive. Assuming everything went well you should now be able to answer the questions to create an account and register the system. When completed the desktop should load using the VESA mode of 1024x768 while this allows you to use OS X it's not the proper resolution and hardware acceleration will not be functional.
Enabling a specific resolution and hardware acceleration for the GMAX3100
This process below seems to only work with the iAtkos 4i disk, I tried it with the newer 5i and the drivers didn't seem to load and I was stuck in VESA mode. To correct the VESA mode we need to open the Safari browser and download the following files, if you have no network available you'll need to download them from another PC and transfer them to your Mac with a USB memory stick. I made direct links to the files to avoid issues with possible revision changes.
If using a USB memory stick you'll need to copy the files to the local disk first, if you downloaded the files with Safari then you simply Double-click each file to start the unzip process and repeat until all three files are uncompressed. We need to install 'SwitchResX' first, install it by double clicking the extracted file 'SwitchResX Installer' follow the prompts to complete the install and when completed it should launch automatically, if not it can be accessed through the 'System preferences' panel located on the taskbar it looks like this icon. ![]()
| After you click the Icon you'll see the main window open, you'll need to click the Tab marked 'Custom' then click the large [+] button near the bottom to access the settings window, make sure the box marked 'Use Simplified Settings' is checked and under Horizontal enter '1280' (or whatever you need for both) and under Vertical enter '800' the Scan rate will be set for you so click the [OK] button and last step is to click the [Apply] button once done it should look like this >>> | 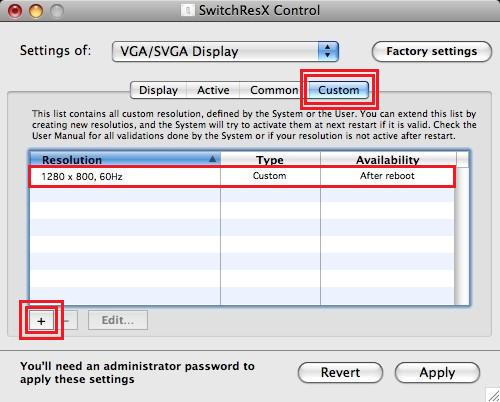 |
Next open the 'Kext helper b7' program by double clicking it, a small window will open, you need drag the 6 files (listed below) under the 'AppleIntelGMAX3100' folder that you extracted earlier onto the 'Kext Helper b7' window, if done correctly you should see these files in the window (the paths will proceed the file names):
AppleIntelGMAX3100.kext
AppleIntelGMAX3100FB.kext
AppleIntelGMAX3100GA.plugin
AppleIntelGMAX3100GLDriver.bundle
AppleIntelGMAX3100VADriver.bundle
Natit.kext
Enter your password (the one you entered to create your account) into the correct Box near the bottom of the window and press the [Easy Install] button, if everything worked you should see a message saying that everything looks fine please reboot, so feel free to reboot. Note: after you reboot if you have the same issue as before then simply repeat the steps above to delete the 'AppleIntel*' files and you should be able to use VESA mode once more.
| Assuming everything went as planned you should see a much better looking desktop that now supports full hardware acceleration lets double check this by opening 'about this mac' and selection the 'more info' button find the 'Graphics/Displays' section and you should see 'Core Image: Hardware Accelerated' and under 'Quartz Extreme: Supported' connecting an external display should also work now, I suggest you re-open 'Switch Res X' and test all the resolutions to see which work and disable those that won't work with your hardware. | 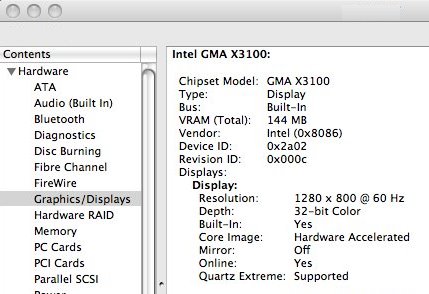 |
Click Here to return to the Main Article