
What's so special about the X-Box?
X-Box FAQ Frequently Asked Questions
Flashing the TSOP of your Xbox Tutorial
X-Box UXE Softmod Installation tutorial
Flash the Firmware of your Xbox 360
What is Qwix and what can it do?
The following is taken right from the Qwix website
Qwix is a very simple to use XBOX Remote File Management and ISO Creation Tool. That's a pretty complicated description, so let me try again. Qwix lets you do a variety of tasks VERY easily, and right from your PC. Have a bunch of ISO's sitting on your PC that you need to load onto your XBOX? Open up Qwix and use the ISO batch upload tool. Just tell it where your ISOs are, and where you want them to be on the XBOX, and then let it fire. It will automatically extract the ISO's out into properly named folders in your games directory. It pulls the game name from the ISO, and even let's you change it if that isn't what you want it to be called in the games menu.
Ok, that's fine and all, but what else can it do? Well, along that same path, it also creates ISOs for you. You select a game from your XBOX that you want to create an ISO from, and tell it where to save on your PC. You can even choose to crosslink files, which means that it will take common areas of the game and "cross" them so that they don't have to appear multiple times. That saves valuable diskspace, and can change a DVDR game into a CDR game!
Beyond that? Well, if you are also using Avalaunch, then you need to go into your avalaunch.xml and make sure that BOOST mode is enabled, because you are gonna love that. When combined with Avalaunch, Qwix has the ability to upload ISO's to your xbox at speeds much faster than you could achieve with a normal FTP client. Give it a try, compare it, and watch Qwix get the files there 3 times faster!
click Here to download Qwix!
Configure Qwix
You keep talking about Avalaunch how can I upgrade my dashboard? Click Here to find out.
Now that we know what it does lets start by showing you how to configure Qwix so you can transfer files to your Xbox. If you just downloaded Qwix it's compressed using the '.rar' format you'll need Winrar to extract the file, uncompress the file into a folder of your choice. No install is required simply double-click the file called Qwix.exe, when launched for the first time a window opens, it will warn you that a connection must be created before you can use Qwix click 'Ok' to continue you will see the main menu
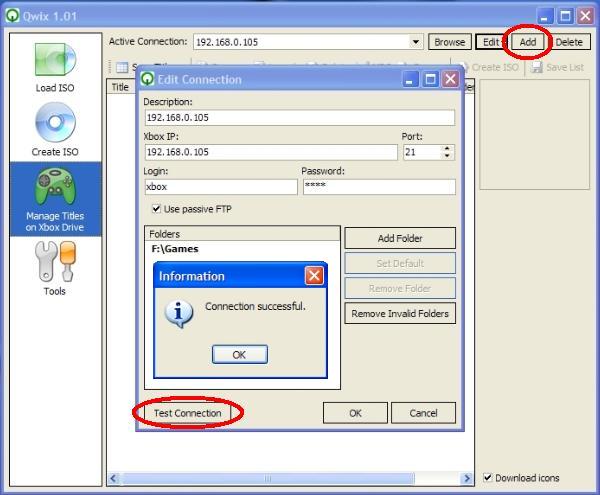
From the main screen where it says 'Active Connection' click the 'Add' button to bring up the Connections sub-menu, here you need to fill out the fields with your Xbox 'IP' address (most dashboards have a way to view this under the settings/network menu) for 'Description' enter whatever you want, leave the Port at 21 setting alone, check off the box that says 'Use passive FTP' now press the 'Test Connection' button at the bottom if everything is ok you will see the 'Connection successful' message. If you don't get this message double-check all your settings and network cables etc.. also at this point if the 'F:\Games' directory isn't shown under Folders you will need to click 'Add Folder' and browse to the correct folder you want your games to be transferred to on your xbox.
Manage Xbox titles with Qwix
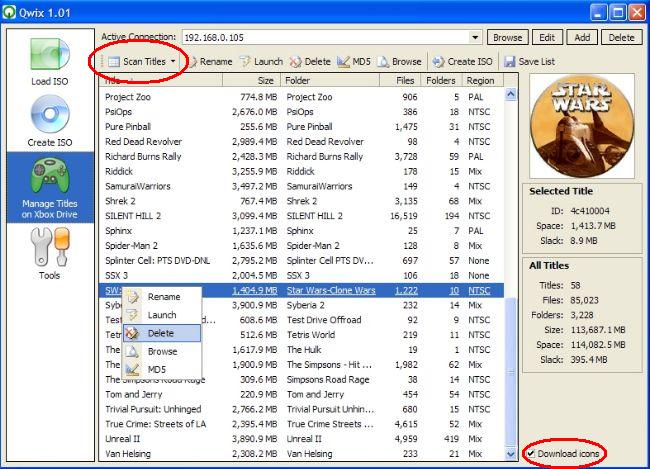
Select the Joystick Icon from the left side of the screen and click the 'Scan Titles' button to populate the screen with all the Titles currently installed on your Xbox (check off the 'Download Icons' box) you will see the Icon associated with the game. to manage titles simply right-click on any title to open the sub-menu (which is shown in the photo below) from here you can Rename, Launch or Delete the game along with any save-games associated with that game (don't worry you have the option to keep the saves) Qwix also tells you the size of the game and number of files and folders installed and if the region is NTSC/PAL or both.
Creating an '.iso' image with Qwix
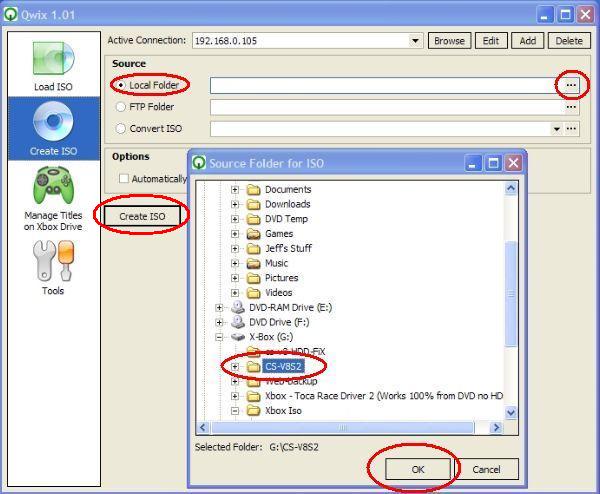
The '.iso' making process has really improved you used to have to download an illegal file called 'gdfimage' (illegal because it was created by Microsoft) it was dos based and had no progress bar then a few other programs came along but sometimes the '.iso' created was not useable (this was due to the authors trying to develop a "gdfimage" program without using any of Microsoft's code) well Qwix makes 100% compatible .iso's and has a wonderfully simple way to do this! Click the image with 'Create ISO' under it from the left-side of the screen, now pick your source it can be a folder that is on your Xbox or from your local PC for the example below we'll create one from a local folder on drive G:\CS-V8S2, you do this by selecting the 'Local Folder' button, then click the 3 dots (...) that are right across this opens a window where you can browse to the folder you wish to use, once selected press the 'OK' button
Now press the 'Create ISO' button another window opens, here select the folder you wish to put the .iso and give it a unique name so that you'll know what the heck the '.iso' is later.
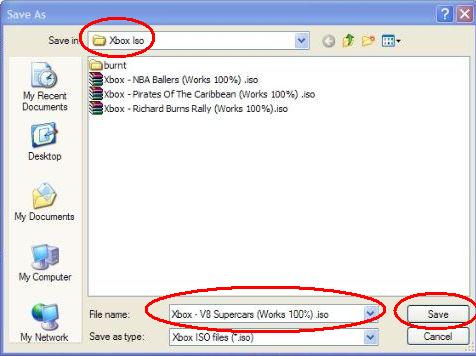
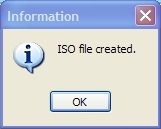
Hit the save button and Qwix will display a progress box that pretty well describes the whole process while its running once complete you'll see the ISO file created box click 'OK' congratulations you have your first '.iso'
Now if you had chosen the 'FTP Folder' option instead of 'Local Folder' you would of course been choosing a folder from your Xbox and creating the .iso on your PC this is an ideal way to back-up any games and of course you're creating the .iso image at the same time! If you want to transfer the game back for some reason you can , if you want to burn the .iso image you can, use any DVD-writing program that supports burning from .iso's and you will have a playable back-up (of course only works on modded Xbox) Nero Burning Rom is my favorite Application for this type of work.
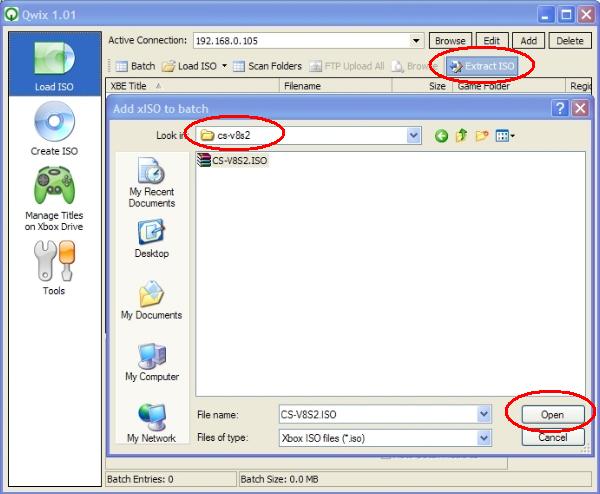
Extracting an '.iso' image with Qwix
Click the image with 'Load ISO' under it from the left-side of the screen, now click the button that says 'Extract ISO' from the window that opens pick your source .iso file for the example below we'll select one called CS-V8S2.iso, once selected click the 'Open' button.

Transferring games to the Xbox with Qwix
Now this is one of the best reasons to use Qwix (especially with Avalaunch dashboard installed as it will be over 3x faster) lets say you toasted you hard-drive and want to re-install all of your favorite games to it. since you created back-up .iso's of all your games this will be a snap what you do is open Qwix and select the icon from the left-side of the screen with 'Load ISO' under it, now click the 'Load ISO' button when the new window opens browse to where your back-up .iso's are and select all of them at once by clicking the first file and hold the 'Shift' key while selecting the last file, all of the, iso's in that directory will be automatically queued, if you wish to select only a few .iso's click each one while holding down the 'Ctrl' key instead. click the 'Open' button when done to complete the queuing process.

Now in the example below I've only loaded one file but if multiple files were selected each one would show up in this screen, whats important to note is that the bottom of the screen tells you the total space required to load all of the .iso's you selected. This really helps when you space is tight and you want to ensure everything will fit!
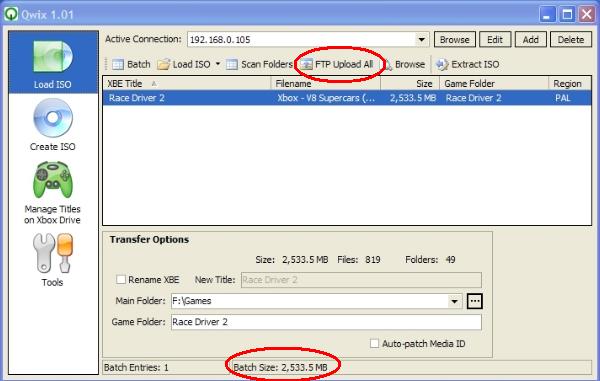
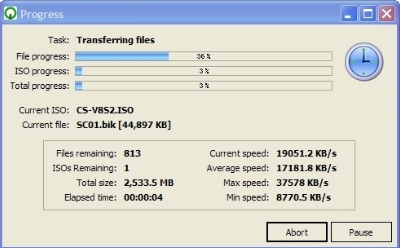
When you're ready simply click the 'FTP Upload All' button and sit back as Qwix loads all of your files, of course a progress box is displayed so you know how long this will take. I have transferred over 40 gigs of files in less than an hour, at an average of 9 megs per second if you're transfer appears to be very slow quit the process and reboot you're PC I've noticed that after using some file-sharing software that my speed was greatly reduced.
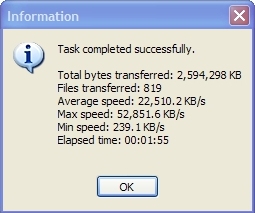
After the upload process is complete you'll see a window with some statistics about the transfer in the example above I moved 2.5 gigs to the Xbox in less than 2 minutes atsee a window with some statistics about the transfer in the example above I moved 2.5 gigs to the Xbox in less than 2 minutes at an average transfer rate of 22,510 KB/s!